|
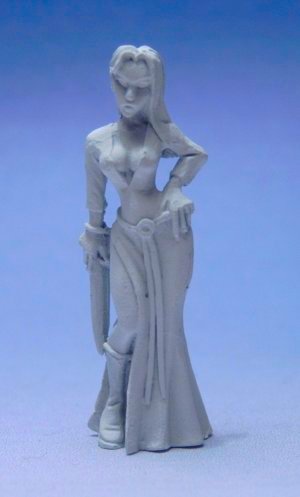
First
of all I start filing down all the mold lines of the metal model. On a small
miniature like this, it is especially important that this is done very carefully
without removing details in hair and the like. I use a gw file, but I'm sure
there are cheaper alternatives that work just as well. When this is done I use
some ethanol to clean the model. This is because the paint might chip off later
if the model still has some metal dust and finger marks on it when primed.
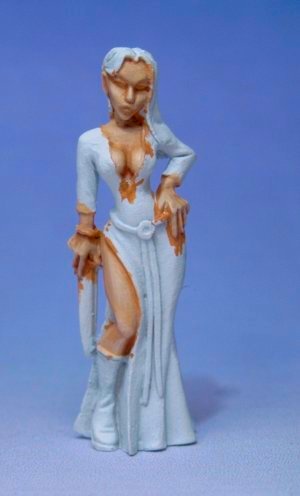
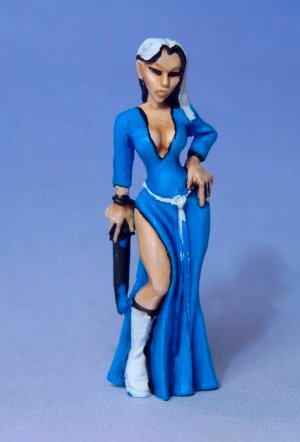
This model I primed white because
I didn't want to use real metal colours on her and the skin colour does not
cover well on black. A white ground also make the blue and purple look slightly
more intense than with a dark prime.
|
 |
| |
|
|
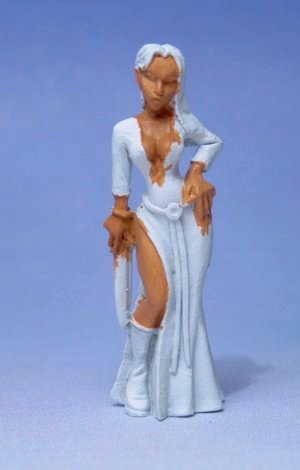
Now
I start painting her skin, this is because the skin parts are the least
accessible ones. This means that if I were to paint the dress first, then it
would be terrible difficult not to ruin the already painted areas when I had to
do the skin later on. I use either gw or Wilson Smith brushes, but those are
also the only ones I have tried. When I start applying the base skin colour I
use a standard sized brush, if it were a large model I could use up to a whole
tankbrush, but this small model would drown in such a big brush and the details
would vanish.
The base skin colour I mix by
dipping the standard brush into some Elf Flesh and transferring on to my mixing
palette. Then I mix some Bestial Brown into it so the mix is of 1 part Brown and
3 parts Flesh colour. This mixing palette is really just the plastic from
a gw blister pack, but almost any surface would do, but I don't recommend a
newspaper as it sucks the moisture out of the paint so your mixed colour will
dry out too soon (I use a newspaper when I drybrush!). When applying your mixed
base colour don't worry about painting beyond the flesh borders as that is
easily corrected afterwards. |
 |
| |
|
|
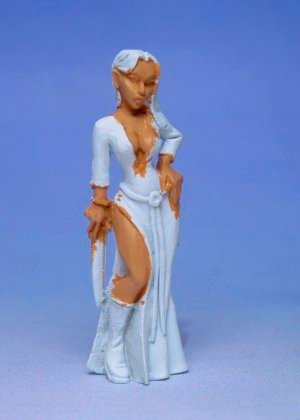
Now we move on to the first
highlight. Note that when I work I don't really "shade" the model as such,
instead I paint the base in the colour I want for the shadows and then highlight
a lot instead. The result is the same, but I find it easier to do this way,
because I can refrain from using inks which can make the model look glossy and
sometimes the ink is difficult to work with making the paintjob look dirty.
The second highlight is made by
mixing 1 part Bestial Brown and 6 part Elf Flesh. I use a fine detail brush
which I dip in the mix and then I dry off the excess paint on a newspaper or
something. If the paint isn't liquid enough, use the brush to drip some more
water in it until the mix flows easily of you brush when painting without being
too watery and incontrollable. When I paint the highlight I kind of rub the
brush with a small amount of easy flowing paint at the edges (the transition
point to the base colour). This is actually a kind of wet blending although both
colours are not wet, but a brush with very little wet paint on will not cover
well which means that the almost transparent paint rubbed on the highlight
area's edges will give a sort of zigzag blending. The first highlight should be
painted on all areas except the deepest cracks and recesses, which should remain
the dark. |
 |
| |
|
|
The next highlight step is pure
Elf Flesh which is applied in the same manner as explained above and on all
areas that are not recessed. This is the main colour for the skin so this colour
is supposed to dominate the shadings. |
 |
| |
|
|
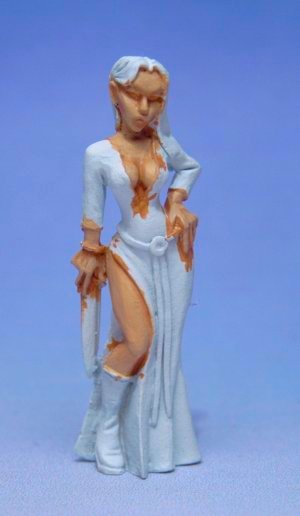
There are now two more steps left
on the skin. We need to put some light on her. Breasts, knees, thighs, forehead,
nose, chin, fingers and cheeks should be highlighted with mix of 1 part white
and 2 parts Elf Flesh. The most raised areas like nose, chin, knuckles and knee
should be highlighted with 1 part white mixed with 1 part Elf Flesh. |
 |
| |
|
|
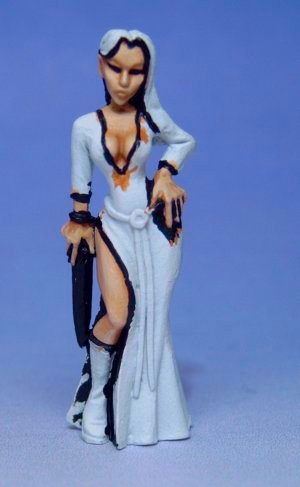
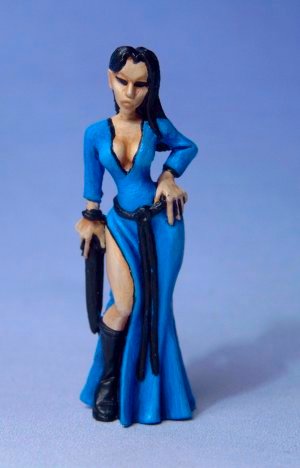
Now
that the skin is done I begin blacklining around it. Blacklines separates the
colours and make the model well defined to look at, makes the details visible
even from fairly far away. You could also use a very dark brown instead of black
and some places where two very contrasting colours meet there is no need for
further separation. The reason I start blacklining now is because it is very
hard to blackline when all the colours are painted as the lines need to be very
thin and precise, especially on this tiny miniature. So doing it now I only have
to make sure the lines look as they should by the skin as the blue colour I
apply on the dress afterwards will cover mistakes made elsewhere. It is also
much easier to make the lines thin this way. |
 |
| |
|
|
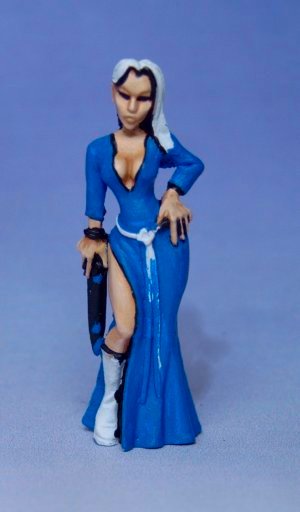
It
is time to paint the dress blue. I use Enchanted Blue and paint a faint streak
of Enchanted Blue mixed with some Regal Blue is painted in the deepest recesses
on the dress, like the folds by her right elbow and the larger ones by the
ground.
|
 |
| |
|
|
Then
I move on to highlighting with a mix of 2 parts Enchanted Blue and 1 part Ice
blue the same way as I highlighted the skin. When you are done, there should be
more areas highlighted than not, this means that the sleeves should be
highlighted on the outside of her arms and her tummy should be slightly
highlighted too.
|
 |
| |
|
|
Her
shoulders, the big folds, her elbow, her hips, her breasts, her bottom is
highlighted with a mix of 3 part Enchanted Blue and 2 part Ice Blue and perhaps
a step higher with and equal mix of the two blues.
|
 |
| |
|
|
I
start blacklining around the blue edges that hasn't already been blacklined when
I was finished with the skin. I also paint all the details black. This is both
because it gives me a good view of what needs to be done and because I want a
black undercoat under the colours.
|
 |
| |
|
|
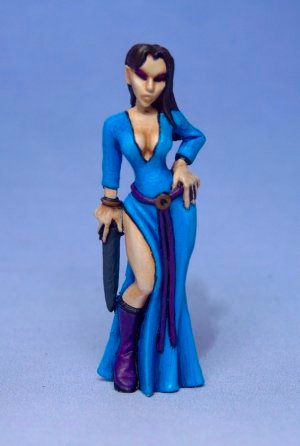
I
now paint the boots, the belt and the area above her eyes with Lich Purple. The
bracelet, belt lock and some on the sword is painted Bestial Brown. The sword
blade is German Grey (which is a Vallejo colour, but some codex grey with a tiny
bit of black in should work well too). The sole and the rem at the top of the
boot is kept mostly black but with a highlight with German Grey. Her hair is
painted scorched brown which may be difficult to see on the picture.
|
 |
| |
|
|
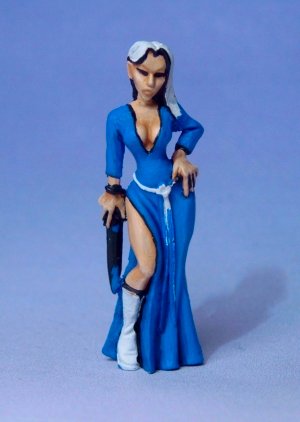
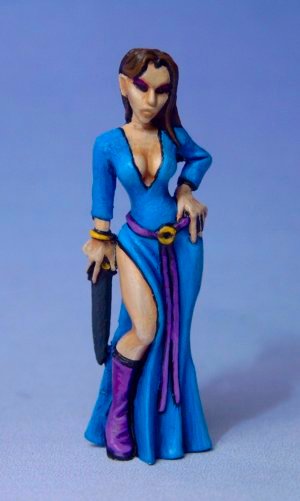
No
we go about highlighting the details. The hair is highlighted with Bestial
Brown. Normally I would drybrush hair with a wet brush, but instead I paint up
the details in the hair because she is so small and the hair isn't raised enough
to make that technique work properly. The purple areas are first highlighted
with 2 part Lich Purple and 1 part white and then with 1 part Lich Purple mixed
with 1 part white. The brown parts are highlighted a couple of times with Golden
Yellow. This is because the yellow colour doesn't cover very well and I take
advantage of that because it means that I doesn't have to mix paints to get a
fairly nice transition from brown to yellow. I just paint each layer of yellow
as a new highlight.
|
 |
| |
|
|
Now
I add the final highlight to the hair with a mix of Vermin Brown and a tiny
amount of white. The eyes are painted white, but I leave some blacklining around
the white. The gold is highlighted once with Flat Yellow (I use this Vallejo
colour instead of Sunburst Yellow because it looks more intense and covers a lot
better) and then once with a equal mix of Flat Yellow and white. I highlight the
few black areas with Codex grey and I also highlight the sword with a mix of
that colour and German Grey. Then I highlight the blade again with just Codex
Grey and finally with Neutral Grey (You could easily use codex grey mixed with
very little white).
|
 |
| |
|
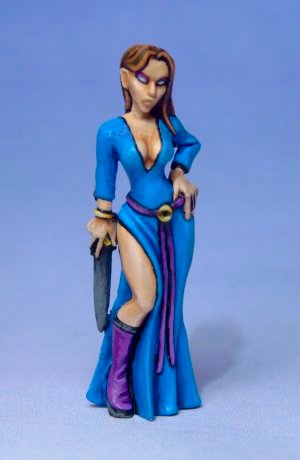
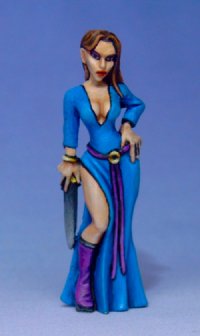
Now I only needed to paint a few
last things. I give the sword a final highlight, I paint her pupils in her eyes
and lastly I painted her lips red. A lot of people thought the lips where a bit
too red, but in case you want to know; the lips where painted black, then Scab
Red (leaving a thin black line between the lips) and lastly I painted to three
white dots on the lips where I wanted stronger highlights. Then I painted it
over with Blood Red along with some of the dark red. The Blood red looks
different when covering white and the dark red. This means that the transition
look great in the end with the white dot trick.
Hope you could use the guide even
though it was a simple miniature!
|
 |